Connecting multiple TeraVault units
When connecting multiple TeraVault (JBOD) units to LiveWire PowerCore, it is important to note that each LiveWire PowerCore and TeraVault unit have LiveAction labels with matching serial numbers. Additionally, each TeraVault unit has a label on the front (designating JBOD 1, 2, 3, etc.), which is the order the units are daisy-chained to LiveWire PowerCore and each of the TeraVault units. Multiple SAS external cascading cables are included and are also labeled to guide you in connecting each of the units.
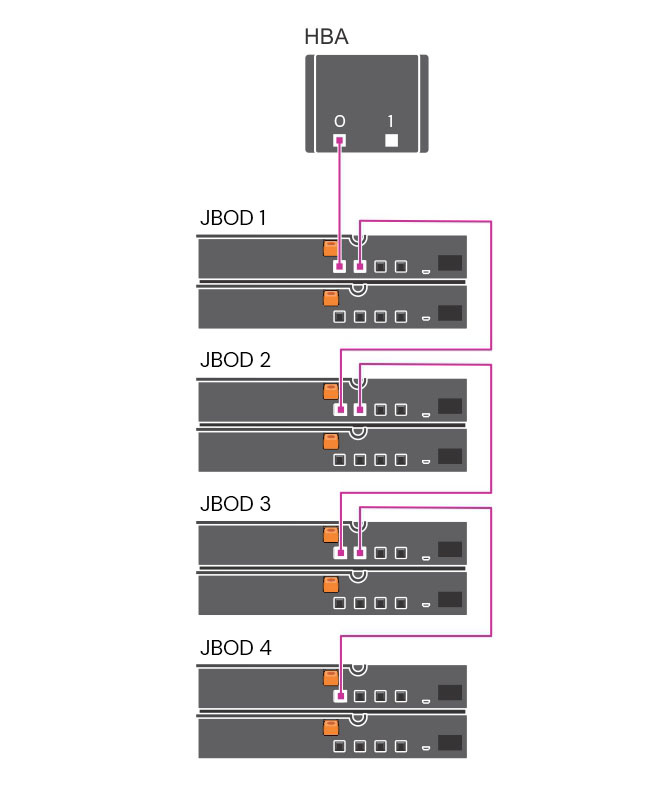
To connect multiple TeraVault units:
1. Locate the LiveAction label on each LiveWire PowerCore and TeraVault unit. Make sure the LiveAction serial numbers are the same on LiveWire PowerCore and each of the storage units.
2. Locate the first TeraVault unit labeled as ‘JBOD 1’ and also the SAS external cascading cable labeled ‘HBA - Port 0.’ Use the ‘HBA Port 0’ cable and connect the TeraVault unit ‘JBOD 1’ to LiveWire PowerCore as described in Connecting TeraVault to LiveWire PowerCore. Make sure the release pull-tab on the cable is on top.
3. Locate the second TeraVault unit labeled as ‘JBOD 2’ and also the SAS external cascading cable labeled ‘JBOD 1 - Port 1.’ Use the ‘JBOD 1 - Port 1’ cable and connect this TeraVault unit to the previous TeraVault unit (JBOD 1). Make sure the release pull-tab on the cable is on top.
4. Repeat Step 3 for any additional TeraVault units, making sure each successive ‘JBOD’ is connected to the previous ‘JBOD’ using the appropriate SAS external cascading cable.