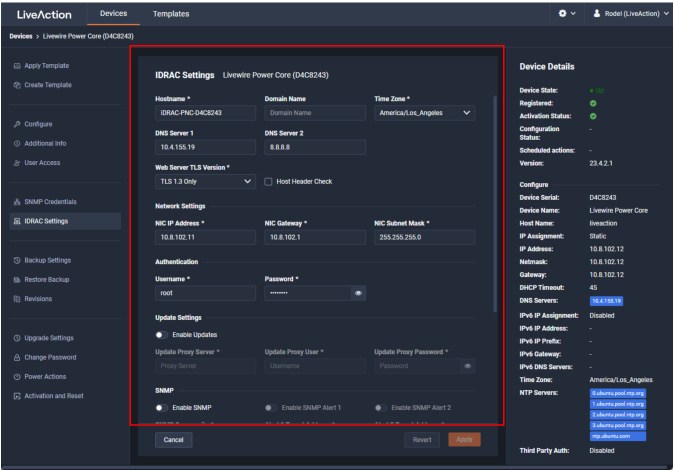
IDRAC Settings
Select the iDRAC Settings to configure various options for LiveWire that would normally be configured by using the iDRAC utility on LiveWire. See also Integrated Remote Access Controller (iDRAC).
NOTE: Only selected options available from the iDRAC utility are available and configurable below.

◦ Hostname: Displays the Hostname of the device. Type a new Hostname to change it.
◦ Domain Name: Displays the Domain Name of the device. Type a new Domain Name to change it.
◦ Time Zone: Displays the Time Zone of the device. Select a new Time Zone to change it.
◦ DNS Server 1: Displays the DNS Server used by the device. Enter a new DNS Server to change it.
◦ DNS Server 2: Displays the DNS Server used by the device. Enter a new DNS Server to change it.
◦ Web Server TLS Version: Displays the TLS protocol version support used by the device. You can select from the following: TLS 1.1 and Higher, TLS 1.2 Only, TLS 1.2 and Higher, and TLS 1.3
◦ Host Header Check: Select to enable Host Header Check requests.
Network Settings
◦ NIC IP Address: Displays the static NIC IP Address of the device. Type a new NIC IP Address to change it.
◦ NIC Gateway: Displays the NIC Gateway of the device. Type a new NIC Gateway to change it.
◦ NIC Subnet Mask: Displays the NIC Subnet Mask of the device. Type a new NIC Subnet Mask to change it.
Authentication
◦ Username: Displays the Username of the device. Type a new Username to change it.
◦ Password: Configures the Password of the device. Type a new Password to change it.
Update Settings
◦ Enable Updates: Select to enable updates on the device. If enabled, you must configure the Update Proxy Server, Update Proxy User, and Update Proxy Password.
◦ Update Proxy Server: Displays the Update Proxy Server of the device. Type a new Update Proxy Server to change it.
◦ Update Proxy User: Displays the Update Proxy User of the device. Type a new Update Proxy User to change it.
◦ Update Proxy Password: Displays the Update Proxy Password of the device. Type a new Update Proxy Password to change it.
SNMP
◦ Enable SNMP: Select to enable the SNMP Agent on the iDRAC. If enabled, you must configure the SNMP Community.
◦ SNMP Community: Configures the SNMP Community name used for SNMP Agents. Type a new SNMP Community name to change it
◦ Enable SNMP Alert 1: Select to enable the SNMP Alert 1 on the iDRAC. If enabled, you must configure the Alert 1 Target Address.
◦ Alert 1 Target Address: Displays the IPv4, IPv6, FQDN address, or hostname of the target destination to receive alerts. Must be valid IPv4, IPv6, FQDN address, or hostname.
◦ Enable SNMP Alert 2: Select to enable the SNMP Alert 2 on the iDRAC. If enabled, you must configure the Alert 2. If enabled, you must configure the Alert 2 Target Address.
◦ Alert 2 Target Address: Displays the IPv4, IPv6, FQDN address, or hostname of the target destination to receive alerts. Must be valid IPv4, IPv6, FQDN address, or hostname.
NTP
◦ Enable NTP: Select to enable an NTP server on the iDRAC. If enabled, you must configure the NTP Server.
◦ NTP Server: Displays the name or IP address of the NTP Server. Type a new name or IP address to change it.
Event Filters
◦ Alert: Displays any iDRAC Event filters configured for the device.
◦ Add: Click to add a new Event filter configured in the text box. You must provide any parameters by defining what you want to be alerted to and how you want to be notified. You can configure as may event filter commands as you want. The general format of an alert category:
idrac.alert.category.[subcategory].[severity]
idrac.alert.category.[subcategory].[severity]
◦ Revert: Click to clear the iDRAC Settings values.
◦ Apply Click to apply the iDRAC Settings to the device.